Hi
I just read this thread, and then checked the Numbers on my Bagheera.
I know from my danish car registration that the car was frist registred in Denmark in 74, so original sold from dealer in Denmark.
And when comparing my chassis number to Lars Gold 74, only the last digit is different, mine ends with 7, the rest is a match.
Chassis nr.: X3550 4 X105367
Assembly nr.: 069226
No number with country code.
Best regards Frederik

|
| | Home | | Blogs | | Help | | Search | | Login | | Register | |
| Pages: 1 ... 4 5 [6] 7 8 ... 10 |
|
51
on: August 22, 2023, 09:02:29 pm
|
||
| Started by Spyros - Last post by Moes | ||
|
52
on: August 20, 2023, 06:17:20 pm
|
||
| Started by AlanMurena1.6UK - Last post by roy4matra | ||
|
That's the first I've heard of different pressures, this cap does exactly match the spec of the original... Yes, Alan, the vacuum release is a function of all caps to allow air back in as the system cools, and this is one reason why the design of the cap sprung seals must match the neck of the radiator or expansion tank deisign. Roy |
||
|
53
on: August 20, 2023, 06:11:49 pm
|
||
| Started by AlanMurena1.6UK - Last post by roy4matra | ||
|
This page of the manual tells about opening pressures. 2 pressures are written . 1 blow of and the other untherpressure Strictly this means that the cap must release at 0.8 bar to allow air (or coolant) out, and at an under pressure (or vacuum) of 0.055 bar it must allow air back in. Actually the note is slightly incorrect as the overpressure release pressure should be 0.85 kPa or 0.85 bar according to the manual. Now 0.055 bar is just 0.8 psi, so what it is telling you is that the cap second sprung seal (just under the cap) must not be so tight that it prevents air being drawn back in when the coolant temp. drops and you get a slight vaccum in the system. This really defines the design of the cap to the neck fitting. If the design is not correct then the seal could be too tight, owing to the greater compression of the spring, and there will be too much pressure on the seal to release as the pressure drops below atmospheric. As long as the design of the cap is the same as the original, then the cap should be fine. Roy |
||
|
54
on: August 17, 2023, 11:37:28 pm
|
||
| Started by Murena IRL - Last post by Oetker | ||
|
I had this problems in the past.
Just for the info some finds in my task to fix the problem In 2007 I had problems with the original Paris Rhone. The diodes had a defect. If you can find new or revived alternators from Peugeot 309/205/405 div Citroen AX BX 1.4 and (Rover 100 not verified) then you can swap the front from the Murena. You have +D for connection with the ghargelight but mis the the other connections that are less relevant (test plug). 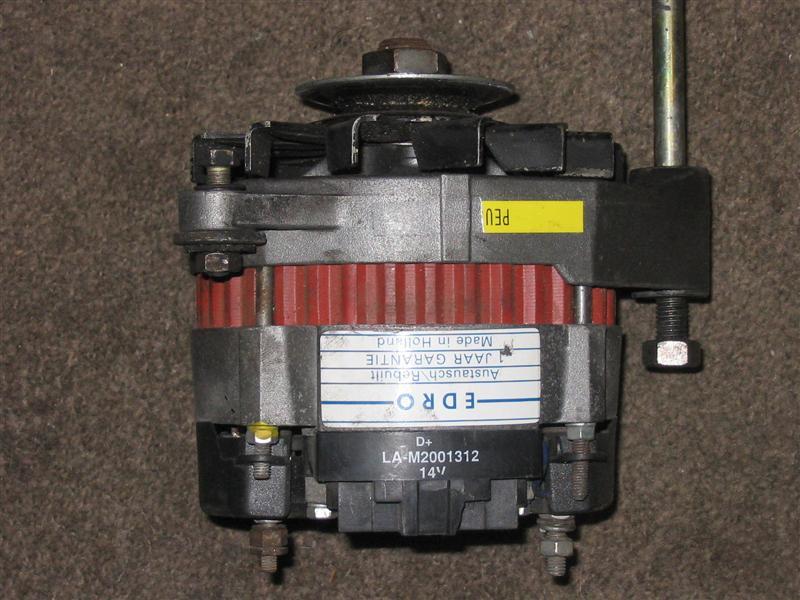  Aditional info for +D connection anchorcoil  |
||
|
55
on: August 17, 2023, 11:15:24 pm
|
||
| Started by AlanMurena1.6UK - Last post by Oetker | ||
|
This page of the manual tells about opening pressures.
2 pressures are written . 1 blow of and the other untherpressure |
||
|
56
on: August 16, 2023, 06:39:21 pm
|
||
| Started by Anders Dinsen - Last post by Anders Dinsen | ||
|
I have had another look at the bolts in the sump. After checking and rechecking I found three bolts that were not seated. I checked that the problem was not that that silicone gasket had leaked into the bolt hole and come in the way blocking the bottom of the hole. On one, I just found a slightly shorter bolt in my box, one now has two washers, and one (the long one on the front inlet side of the engine) was replaced with a somewhat more shorter bolt. I guess the learning point here is that the bolts should be checked and possibly shorted when there's no original gasket or spacer.
Since the last post, I've also fitted the clutch slave cylinder remembering to grease it well and fit the locking ring the right way around. Finally, I've fitted the supplementary water pump and realized that now that the engine wiring loom is fitted on the chassis, ignition coil and ignition module, the wiring to the connector on my otherwise perfect wiring loom is too short. I only have myself to blame for that mistake. Edit: This evening, I have fitted the rear roll bar and cleaned the long gear change rod to prepare it to be painted with black Hammerite. /Anders |
||
|
57
on: August 13, 2023, 10:32:56 pm
|
||
| Started by Anders Dinsen - Last post by Anders Dinsen | ||
|
Rather than having to drill the holes deeper and thread them down further into the block, which is awkward when you would be working from underneath, why not shorten the bolts a little? That is certainly a possibility as well, but I'm not 100% convinced that the problem is lack of thread depth, I'm thinking it could also be dirt or something else, so for now I'll rectify with an additional washer as it can be reverted easily should I find that I have overlooked something. Quote Thanks for this information Anders, as I am now forewarned and will check mine 'dry' before I fit my sump to the one I'm building up and was going to trial the sump fitting without any gasket. It is little problems like this that I like to see and overcome before I normally pass on any modification suggestions for other owners, but you have beaten me to doing this modification! I still think this will eventually be the better way to seal the sump to the engine as well as keeping it solid so the engine and sump move together and the vibrations cannot disturb the seal and create an oil leak. You're very welcome. Your enthusiasm about this possible solution made me want to try it, and since I was able to trial fit until I knew everything would fit well, only overlooking the length of the bolts, I was completely without doubt when I did it. I agree, this is a much better way to seal the sump! |
||
|
58
on: August 11, 2023, 08:18:53 am
|
||
| Started by Anders Dinsen - Last post by roy4matra | ||
|
I have run into a small problem with the sump due to the fitting without the gasket. It turns out that due to the lack of the 1.8 mm thick gasket and spacers, a few of the sump bolts have reached the bottom of the thread cut in the bolt holes in the engine block. I noticed that some washers were loose - I didn't notice when I did the bolts this weekend. I'll undo those bolts and put an extra washer on, but this is really where my fitting-with-the-engine-in-the-car has become awkward. Have I had the engine on a stand, I would have noticed immediately when trial fitting, and would have cut the threads deeper to take the bolts. /Anders Rather than having to drill the holes deeper and thread them down further into the block, which is awkward when you would be working from underneath, why not shorten the bolts a little? Since we are only talking of two threads, and small 7 mm bolts, I would use my Dremel with a cutting disc, holding the bolts in my bench vice and then cut the ends off each one that fouls. Or if you didn't want to cut the originals down, then possibly obtain some new ones that are a bit shorter, if such are available? However, knowing how bolt lengths tend to change up or down in 5 mm steps, the next shorter ones may be too short, although I don't think they would be, but I haven't one to hand to check its length. There are 22 of the small 7 mm ones as well as the two large bolts near the clutch bell housing. Do all the 7 mm ones bottom out, and are the two large bolts bottoming too? Thanks for this information Anders, as I am now forewarned and will check mine 'dry' before I fit my sump to the one I'm building up and was going to trial the sump fitting without any gasket. It is little problems like this that I like to see and overcome before I normally pass on any modification suggestions for other owners, but you have beaten me to doing this modification! I still think this will eventually be the better way to seal the sump to the engine as well as keeping it solid so the engine and sump move together and the vibrations cannot disturb the seal and create an oil leak. Roy |
||
|
59
on: August 10, 2023, 09:50:31 pm
|
||
| Started by Anders Dinsen - Last post by Anders Dinsen | ||
|
I have run into a small problem with the sump due to the fitting without the gasket. It turns out that due to the lack of the 1.8 mm thick gasket and spacers, a few of the sump bolts have reached the bottom of the thread cut in the bolt holes in the engine block. I noticed that some washers were loose - I didn't notice when I did the bolts this weekend.
I'll undo those bolts and put an extra washer on, but this is really where my fitting-with-the-engine-in-the-car has become awkward. Have I had the engine on a stand, I would have noticed immediately when trial fitting, and would have cut the threads deeper to take the bolts. I'm starting the refitting of components on the engine. I dismantled, cleaned and greased the distributor earlier this week, and I've also prepared the thermostat housing for fitting. This evening, I fitted and connected the alternator. I realized that the bolts I bought were just a little too short to take the added thickness of the "strækfisk" (I love that norwegian word for turnbuckle), so I need to go to the shop again. /Anders |
||
|
60
on: August 07, 2023, 06:20:37 am
|
||
| Started by Anders Dinsen - Last post by Anders Dinsen | ||
|
I got my toolset for releasing the pins from the connector. I think I spent more than an hour releasing two pins out of the six - and I'm not sure they're in a good state any more as I compressed them from all sides, so I have more or less given up, will cut the wires, and replace the connector with a standard six way modular connector. This connector is sitting in space created by the bulge in the chassis under the right hand rear light and there's a decent amount of space there for the bigger connector, so the only problem with this solution is that while the original connector can easily pass through the holes in the chassis, the 6 way modular connector which I'm going to replace it with can not. Fortunately it will be easier to release the pins after which the loom will be able to pass. Whilst I can understand that even with the correct tools these tiny terminals are often difficult to release and be withdrawn, it is most likely the barbs can be flattened in the process. However, with a small tool such as in a pick set you can usually, carefully bend the barbs back out, to make the terminals lock again when refitted to the plugs. So if you haven't cut all the wires yet, that might be worth trying first. If the circular tube part has become misshapen, pushing a mating pin into it can re-shape it back, and if that also means the tube is tighter on the pin, that only increases the effectiveness of the contact, so can make the plug and socket better from an electrical point of view. Just a thought that may save you replacing the whole thing. Well done on the technique for re-fitting the sump cleanly and accurately, Anders. Roy The problem with the pins seems to be that even though I pushed in the locking pins, I still could not get the terminals out. Somehow the shape of the housing and the terminals mate in such a way that it is almost impossible. I'm going to give it another try, but for the two terminals that I managed to extract, I worked so much that I worry that I have damaged the housing. Thanks a lot! I'm satisfied with the result so far. The engine now has a fresh oil filter and new synthetic oil. I wanted to crank it to get the oil thrown around a bit, but my garage-battery needed a recharge and I realized that my charger has died and need a new thyristor.... /Anders |
||
| Pages: 1 ... 4 5 [6] 7 8 ... 10 |
|
|